
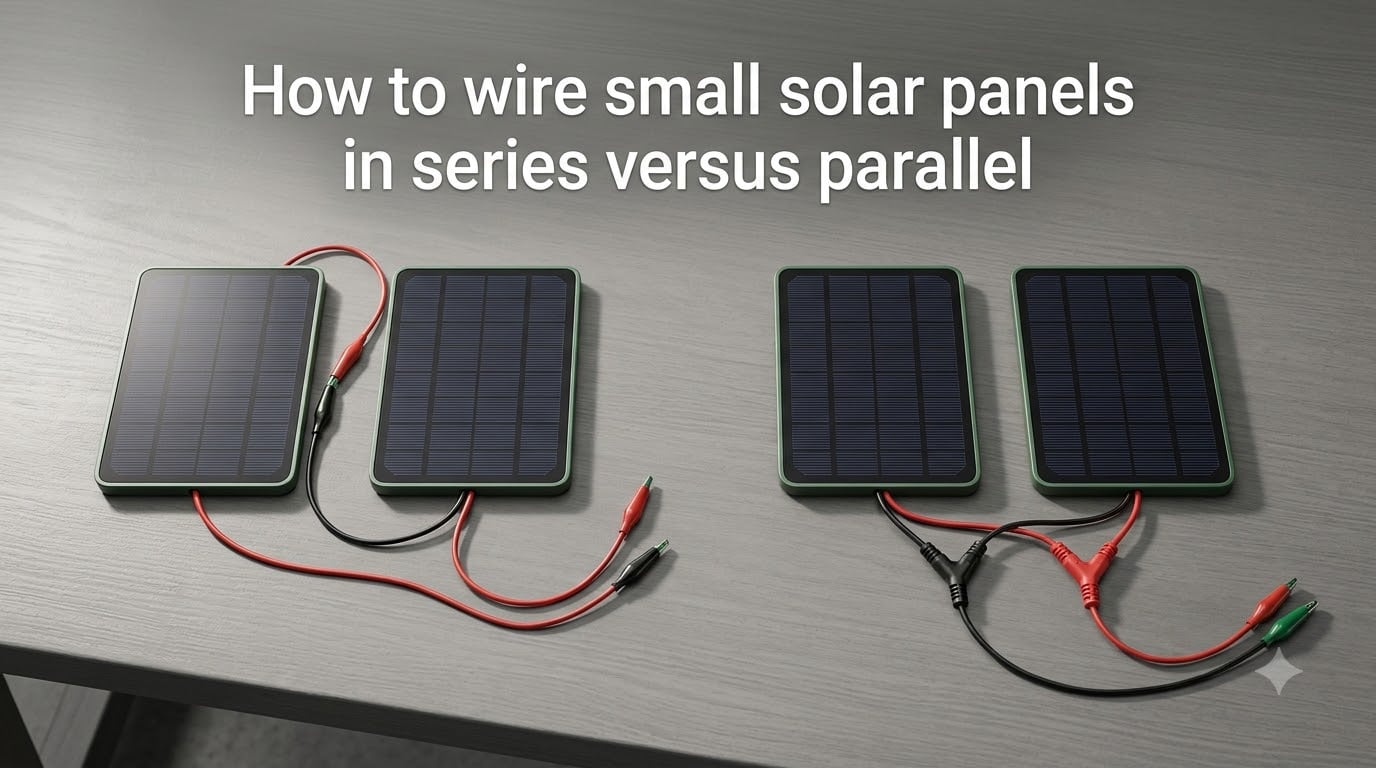
Wiring small solar panels in series versus parallel comes down to one rule: series adds voltage, parallel adds current. When I built my first off-grid cabin setup with two 100W panels, I got this backwards and almost cooked a charge controller. After that lesson, I started helping neighbors wire their RV and van systems, and the same question kept coming up: which way should I connect my panels?
This guide walks through the exact process I use, with real numbers you can verify on your own panel label. By the end, you’ll know how to wire small solar panels in series versus parallel for any 2 to 6 panel setup, and which configuration matches your charge controller, your battery bank, and your shade situation.
Table of Contents
How to Wire Small Solar Panels in Series Versus Parallel: The Core Difference
Series wiring daisy-chains the positive terminal of one panel to the negative terminal of the next. The result: voltage stacks up while current stays locked to the lowest panel in the string. Two 100W panels rated at 18V and 6A wired in series produce around 36V at 6A.
Parallel wiring connects all positive terminals together and all negative terminals together. The current stacks up while voltage stays fixed. The same two 100W panels wired in parallel produce around 18V at 12A.
The configuration you pick decides three things downstream: which charge controller you can use, how much voltage drop you tolerate over cable runs, and how badly partial shade hurts your output. Choosing wrong means buying the wrong controller or watching your system underperform in morning or evening shade.
How to Wire Solar Panels in Series?
To wire solar panels in series, connect the positive (+) lead of panel 1 to the negative (−) lead of panel 2. The free positive lead on panel 2 and the free negative lead on panel 1 become your output cables heading to the charge controller.
Voltage and Amperage Math in Series
Open-circuit voltage (Voc) is the number printed on the back of every panel label. It’s what the panel produces with no load attached. Most 100W panels show a Voc around 21 to 22V and an operating voltage (Vmp) near 18V.
When you string panels in series, you add the Voc values, not the Vmp. Two panels at 22V Voc in series give you 44V Voc, which matters because your charge controller must accept that voltage on input. Most PWM controllers cap at 30V input, so two 100W panels in series will exceed their rating.
Short-circuit current (Isc) does not stack in series. Whichever panel has the lowest Isc caps the whole string. Two identical panels in series behave predictably. Mix a 100W panel with a 50W panel and the 50W panel drags down performance during partial shade on the larger panel.
Step-by-Step Series Wiring
Step 1. Turn off the charge controller and disconnect the battery before touching any panel leads.
Step 2. Mount both panels so their junction boxes face you and the MC4 connectors are accessible.
Step 3. Plug the male MC4 connector from panel 1’s positive lead into the female MC4 connector on panel 2’s negative lead.
Step 4. The remaining free leads (panel 1’s negative and panel 2’s positive) run to your charge controller’s PV input.
Step 5. Reconnect the battery, then power on the controller and confirm the input voltage matches your expected series sum.
How to Wire Solar Panels in Parallel?
To wire solar panels in parallel, connect positive to positive and negative to negative. You’ll need a Y-branch parallel adapter (also called a parallel connector) or a combiner box, since MC4 connectors don’t naturally allow two positives into one lead.
Voltage and Amperage Math in Parallel
In a parallel array, voltage stays at one panel’s Voc while current adds. Two 100W panels at 22V Voc and 6A Isc in parallel give you 22V Voc at 12A Isc.
Wattage stays the same regardless of wiring. Two 100W panels wired either way produce around 200W under ideal sun. The choice between series and parallel is about matching that output to your controller and battery, not about getting more power.
Parallel keeps your array at a PWM-friendly voltage (under 30V for two 12V-nominal panels). This is why parallel is the default choice for small cabin, RV, and shed systems running on a 12V battery bank with an inexpensive PWM controller.
Step-by-Step Parallel Wiring
Step 1. Power down the controller and disconnect the battery.
Step 2. Strip and label each panel’s positive and negative leads if they aren’t pre-terminated with MC4.
Step 3. Take a Y-branch parallel adapter (one female input to two male outputs, plus one male to two female) and plug each panel’s positive lead into the female side and each negative lead into the male side.
Step 4. The Y-branch single output runs to the charge controller PV input. Add an inline fuse rated slightly higher than your combined Isc on each positive lead before the Y-branch.
Step 5. Reconnect the battery last, then power on the controller and verify the input current and voltage match your expected parallel sum.
Series-Parallel Combined Wiring for 4 Panels
When you scale to 4 panels, you can split them into two series strings, then combine those strings in parallel. This balanced approach raises voltage (so MPPT controllers run efficiently) without pushing it past the controller’s input ceiling.
For four 100W panels rated at 22V Voc, two pairs in series give you 44V Voc per pair at 6A. Combining the pairs in parallel holds voltage at 44V while bumping current to 12A. This setup works well with most 40A or 60A MPPT controllers that have a 100V input ceiling.
The series-parallel hybrid shines on mid-sized systems where pure series would exceed controller voltage and pure parallel would waste the controller’s high-voltage conversion capability.
When to Use Series vs Parallel: Real-World Scenarios
| Scenario | Best Wiring | Why |
|---|---|---|
| Unshaded roof, MPPT controller, long cable run to battery | Series | Higher voltage cuts current, which reduces voltage drop on long wire runs |
| Partial shade from trees or structures | Parallel | One shaded panel only drops its own contribution, not the whole string |
| 12V battery bank with PWM controller | Parallel | PWM controllers want panel voltage near battery voltage; series overshoots |
| Small 2-4 panel portable system | Parallel | Forgiving of partial shade, matches cheap controllers, easier to expand |
| Off-grid home with 4kW+ array | Series or series-parallel | Higher voltage strings reach inverter DC input efficiently |
My own rule of thumb: if your panels face a tree line or you’ll move them around during the day, choose parallel. If they’re mounted permanently in full sun and your controller is MPPT, choose series for the wire savings.
MPPT vs PWM Charge Controllers and Your Wiring Choice
MPPT (Maximum Power Point Tracking) controllers accept a wide range of input voltages and convert excess voltage into additional current. They pull roughly 30% more energy from a series-wired array than a PWM controller would from the same setup. If you buy MPPT, you almost always want to wire your panels in series.
PWM (Pulse Width Modulation) controllers are cheaper and simpler. They essentially connect the panels directly to the battery and pulse to regulate charging. They expect panel voltage to stay close to battery voltage, so a 12V battery paired with two 18V panels in parallel keeps things in the safe zone. Series wiring a 36V string into a 12V PWM controller will not charge properly and can damage the controller.
Check your controller’s spec sheet for two numbers: maximum PV input voltage and maximum charge current. Series wiring pushes voltage up, parallel pushes current up. Your wiring must keep both numbers within the controller’s limits.
Safety Warnings and Common Wiring Mistakes
Solar panels are always live when exposed to light, even at night if there’s a flashlight nearby. Treat every wire as energized until you cover the panels with opaque material or work at night with no lights on the array.
Most wiring errors come from mixing configurations by mistake. The classic one: a homeowner daisy-chains panels in series to reach an MPPT controller, then realizes the controller is PWM and reconnects in parallel, but leaves one series jumper in place. The result is two panels in series feeding a PWM controller, which silently degrades the controller and the battery.
Use matching MC4 connectors everywhere. Mixing brands can leave you with a connection that arcs under load. Never rely on wire nuts for DC solar wiring outdoors. Heat-cycled, weather-rated connectors are mandatory.
Add fuses on every parallel positive lead before the combiner. Without fuses, a single shorted panel can backfeed through the parallel junction and overheat the wiring before you notice.
Small Panel Specific Tips for 50W, 100W, and 200W Systems
50W and smaller panels (used for trickle charging sheds, gates, or small electronics) almost always wire in parallel. Their lower Voc values stack awkwardly in series, and a single shaded 50W panel drags down a series pair badly. Y-branch adapters sized for MC4 connectors handle 2-4 panels cleanly in parallel.
100W panels are the most common size in DIY solar. Two 100W panels work fine in either series or parallel depending on your controller. Three or four should usually be a series-parallel hybrid to stay inside MPPT voltage limits.
200W panels run higher Voc (often 24V or more), so even two of them in series push 48V. Check your controller’s max input before stringing them. MPPT with at least a 100V input ceiling is the safe pairing for two 200W panels in series.
Troubleshooting Common Wiring Errors
If your controller reads zero input, check the MC4 connections first. A reversed polarity (positive to negative by accident) won’t damage the panels but will trip the controller’s reverse polarity protection. Unplug, swap, and try again.
If voltage reads correctly but current is far lower than expected, you likely have a loose parallel connection. Heat the suspect connector with your hand: a warm connector under no load means resistance is too high. Re-crimp or replace.
If one panel in a series string is shaded and the whole string drops to near zero output, switch to series-parallel or full parallel. Shade on a series panel affects the entire string because current must pass through every panel.
If your controller displays an over-voltage error, your series sum exceeded its input ceiling. Reconfigure to parallel or series-parallel to drop the input voltage into the safe range.
Frequently Asked Questions
Should I wire two solar panels in series or parallel?
If both panels are 100W and your charge controller is PWM with a 12V battery, wire them in parallel. Parallel keeps voltage at one panel’s level (around 18-22V) while doubling current, which matches PWM controller requirements. If your controller is MPPT and the panels are mounted in full sun, wire them in series to double voltage and halve current, which reduces voltage drop on long cable runs.
What is the 33% rule in solar panels?
The 33% rule applies to MPPT charge controllers: your array’s open-circuit voltage (Voc) should be at least 33% higher than the battery bank’s nominal voltage. For a 12V battery (about 14.4V charging), your array Voc should reach at least 19V. This ensures the MPPT controller has enough overhead voltage to convert excess into useful charging current. Many installers aim higher, around 1.5x to 2x, for better efficiency.
How to wire small solar panels in parallel?
Power off your charge controller and disconnect the battery. Plug each panel’s positive lead into the female input side of a Y-branch parallel adapter and each negative lead into the male input side. Add an inline fuse on each positive lead rated slightly above the panel’s Isc. Run the Y-branch single output to your charge controller’s PV input, reconnect the battery, then power on the controller.
Can you connect 100W and 200W solar panels together?
Yes, but the configuration matters. In series, the smaller panel caps the string current and drags down overall performance, especially during shade. In parallel, the 200W panel still produces its full contribution but the mismatched voltages cause some power loss at the controller. The cleanest setup is putting each panel on its own MPPT input if your controller supports dual inputs, or running each through a separate charge controller on the same battery bank.
Final Thoughts on Series vs Parallel Wiring
To wire small solar panels in series versus parallel, match the configuration to your controller and shade conditions, not to one rule of thumb. Series fits MPPT systems in full sun with long cable runs, parallel fits PWM systems and any setup where shade touches the array during the day. Series-parallel bridges the gap when you scale to 4 or more panels and need higher voltage without exceeding your controller’s input limit.
Verify your Voc and Isc from each panel’s label, sketch the wiring before you touch any connector, and size fuses and wire gauges for the combined current. Once you’ve wired your first setup correctly, the next one takes half the time.