
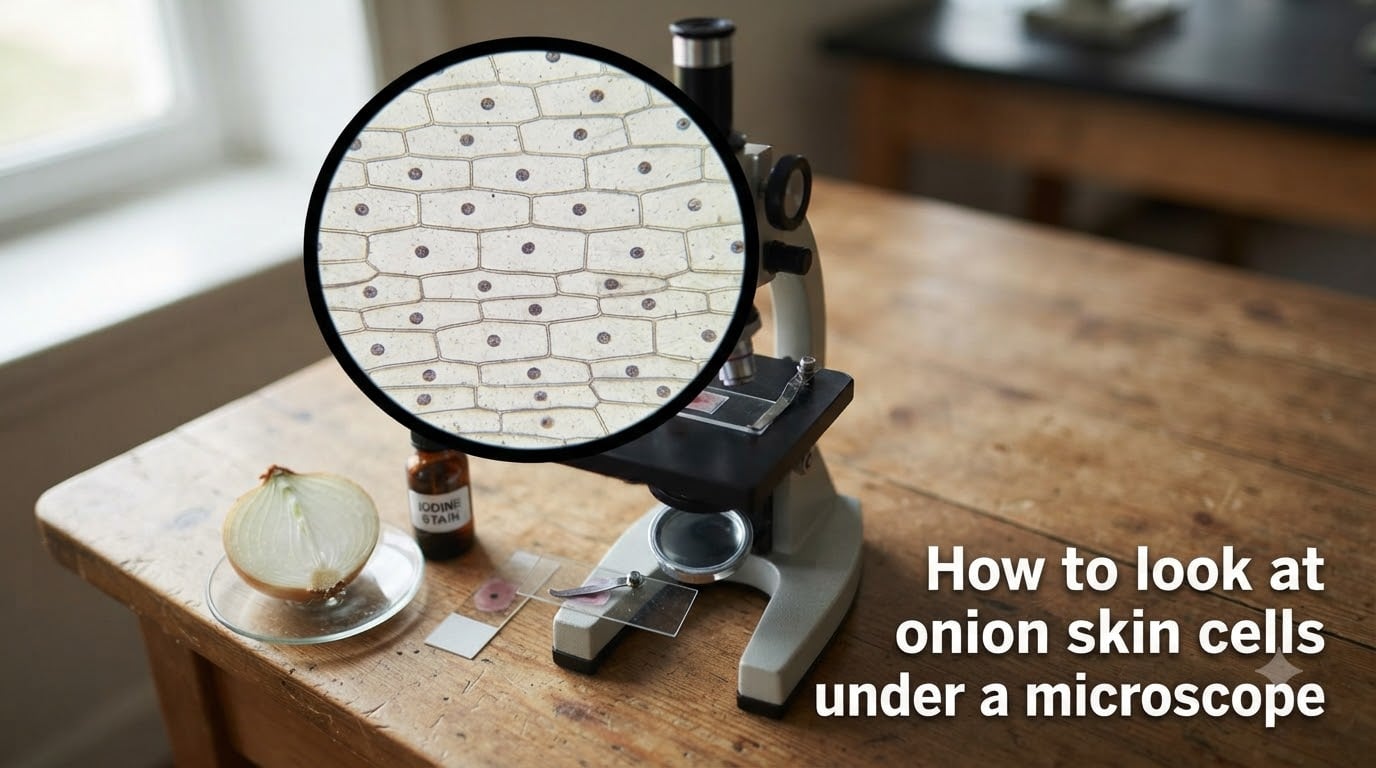
If you have ever wanted to peek inside a living plant cell without expensive equipment, learning how to look at onion skin cells under a microscope is the perfect place to start. I have walked dozens of students through this exact procedure, and the moment they see those brick-shaped cells lined up under the lens is genuinely exciting every single time.
Onion epidermal cells are translucent, easy to peel, and large enough to show clear detail at basic school-grade magnification. In this guide, I will show you the full process from peeling the membrane to spotting the nucleus, plus a few troubleshooting tips that solve the most common beginner mistakes.
Table of Contents
What You Need to View Onion Skin Cells Under a Microscope?
You only need a handful of supplies, and most classrooms or homeschool labs already have them on hand. Here is the complete materials list before you start.
A fresh onion (yellow or white works best; red onion is also great for younger students)
A compound light microscope with objective lenses of 4x, 10x, and 40x
Glass microscope slides
Coverslips
A pipette or eyedropper
Distilled or tap water
Iodine stain (or methylene blue as an alternative)
Tweezers or forceps
Paper towels for blotting excess liquid
Optional but useful: a razor blade or scalpel for ultra-thin peels, and a lab notebook for sketching what you observe.
How to Prepare an Onion Cell Slide Step by Step
The wet mount technique is the fastest and cleanest way to prepare onion cells for viewing. Follow these four steps in order, and you will have a usable slide in under five minutes.
Step 1: Peel a Thin Layer From the Onion
Cut the onion in half and locate the thin, papery membrane on the inner curve between two layers. Using tweezers, gently tear a small piece about one centimeter square. The thinner the membrane, the better your image will be at higher magnification.
Step 2: Place the Membrane on the Slide
Put the peeled onion skin flat in the center of a clean glass slide. If it curls up, add one drop of water first to help it settle. Try to avoid folds or wrinkles, since those will block your view of individual cells.
Step 3: Add One Drop of Iodine Stain
Place a single drop of iodine solution directly on top of the onion membrane. Iodine binds to the nucleus and makes the cell structure far more visible. If you do not have iodine, methylene blue works as a substitute, though iodine gives the clearest contrast for plant cells.
Step 4: Lower the Coverslip at an Angle
Hold a coverslip at a 45-degree angle to the slide, with one edge touching the drop of stain. Slowly lower it to push air out the other side. This angled method prevents the air bubbles that ruin more beginner slides than any other mistake.
Blot any excess liquid from the edges with a paper towel. Your slide is now ready for the microscope stage.
How to Focus Your Microscope and Find the Cells
Magnification progression matters more than maximum power. Start low, get sharp focus, then move up. This is the single biggest difference between a clear image and a blurry mess.
Start at 4x. Place the slide on the stage and use the coarse focus knob to bring the tissue into view. Onion cells should already be visible as long brick shapes.
Center your target. Move the slide so a single clear row of cells sits in the middle of the field of view.
Switch to 10x. Refocus using the coarse knob, then fine-tune with the fine focus knob.
Move to 40x for detail. At this magnification, the nucleus becomes clearly visible as a dark spot inside each cell. Only use the fine focus knob here, since the working distance is very short.
Pro tip: if you lose the image when switching to 40x, return to 10x, recenter, and try again. That happens to almost everyone the first few times.
What You Will See Under the Microscope
Once focused at 40x, you are looking at a beautiful example of plant cell biology. Here is what each structure looks like and what it does.
Cell Wall
The outermost rectangle around every cell. The cell wall is what gives plant cells their rigid, geometric shape, like bricks stacked in a wall. It is also what makes onion cells easier to see than animal cells, which lack this outer boundary.
Nucleus
A small, dense, dark spot near the edge of each cell. The iodine stain binds to DNA inside the nucleus, which is why it appears darker than the surrounding cytoplasm. In a good preparation, you can see one nucleus per cell.
Cytoplasm and Vacuole
The light, transparent area filling most of the cell is the cytoplasm, and the large pale region inside is the central vacuole. The vacuole stores water and dissolved nutrients and pushes the cytoplasm and nucleus toward the cell wall.
Why Onion Cells Lack Chloroplasts
One question students always ask is why onion cells do not look green. The answer is simple and worth remembering.
Onion bulbs grow underground, away from sunlight. Chloroplasts are the organelles that capture light for photosynthesis, so any cell living below the soil has no reason to produce them. Only the green leaves above ground contain chloroplasts. If you want to see green plant cells, look at the surface of a leaf or a moss leaf instead.
Onion Cells vs Animal Cells Under a Microscope
Cheek cells and onion cells are often compared in biology classes because the differences are easy to spot. Here is a side-by-side look at what separates plant cells from animal cells.
Cell wall: Present in onion cells, absent in cheek cells. This is the most visible difference.
Shape: Onion cells are rectangular and uniform; cheek cells are round and irregular.
Vacuole: Onion cells have one large central vacuole; cheek cells have only tiny ones, if any.
Nucleus visibility: Both have nuclei, but onion nuclei show up much more clearly with iodine staining.
Chloroplasts: Onion cells have none; animal cells never have chloroplasts.
The takeaway for students is that the cell wall and large vacuole are defining features of plant cells, not animal cells.
Troubleshooting Common Slide Preparation Problems
Even with a perfect procedure, things sometimes go sideways. Here are the issues I see most often, and how to fix each one.
No cells visible. The membrane is probably too thick or folded. Reposition the slide and try a new, thinner peel.
Too many air bubbles. You likely dropped the coverslip straight down. Remove it, add more stain, and lower the coverslip at a 45-degree angle.
Cells appear too dark. You used too much iodine. Dilute the stain with a drop of water next time.
Image is blurry at 40x. You are using the coarse focus knob. Switch to the fine focus knob only when at 40x.
Cannot find the nucleus. The stain may not have reached it. Let the slide sit for one to two minutes after adding iodine so it can soak in.
Slides dry out within 10 to 15 minutes, so view your preparation quickly. If you need to keep one longer, seal the coverslip edges with clear nail polish to slow evaporation.
Frequently Asked Questions
What magnification is best for onion cells?
Start at 4x to locate the tissue, move to 10x for general structure, and finish at 40x to see the nucleus clearly. Higher magnification like 100x requires oil immersion and is rarely needed for onion cells.
What does onion skin look like under a microscope?
Onion skin cells appear as rectangular, brick-like structures lined up in rows. With iodine stain, you can see a small dark nucleus, transparent cytoplasm, and a large central vacuole inside each cell.
How do you prepare a microscope slide of onion cells?
Peel a thin translucent layer from the inner membrane of an onion, place it on a glass slide, add one drop of iodine stain, and lower a coverslip at an angle to avoid air bubbles.
Why do we stain onion cells before viewing?
Onion cells are nearly transparent and hard to see without stain. Iodine binds to the nucleus and adds contrast, making the cell wall and other structures clearly visible under the microscope.
Final Thoughts
Learning how to look at onion skin cells under a microscope is one of the most rewarding beginner biology experiments you can do. The procedure takes just a few minutes, the materials are inexpensive, and the result is a clear, textbook-quality view of plant cell structure. Once you have mastered onion cells, try cheek cells, leaf cells, or pond water next to keep exploring the microscopic world.